Plasma Mobile Installation on a Desktop
Plasma Mobile is .. well, it’s KDE Plasma, adjusted and tweaked for use in mobile. The tagline is “Plasma, in your pocket” and the sub-title on the PlaMo website is “Privacy-respecting, open source and secure phone ecosystem.” You can get it on the PinePhone and elsewhere. “Elsewhere” can be made to work, but I’ve had a bit of a struggle to get there.
The reason I’m writing this is that a user showed up in the #calamares IRC channel asking for installation help for Plasma Mobile Desktop (wut?). Calamares is an adaptable modular Linux installer which is used by lots of Linux distro’s as the basis for their (ISO or USB-stick) installer. It is also used by some editions of KDE neon, and it turns out that Plasma Mobile has an ISO image for “desktop devices” which are regular x86 systems. That includes x86 2-in-1 desktop / tablet machines, like Lenovo’s Yoga and Dell also has 2-in-1s.
Today’s image (that is, neon-mobile-20201213-1707.iso) needed the following workarounds.
Remember that the PIN and the password are the same thing, and the “live user” PIN is 1234. If there are regular authorization prompts (like from kauth) then that’s the password.
Swiping up from the bottom of the screen (for me, clicking on the up-arrowish thing near the bottom of the screen does the job) shows a purple “Install System” icon.
Clicking on that icon turned the whole screen purple with the installer icon in the middle – that’s launch feedback in mobile – but didn’t actually run the installer. This might be related to running the ISO in a virtual machine (VM) with limited graphics and that Wayland is freaking out.
Even with launching Calamares correctly, installations (as reported by one user, and confirmed by me) failed, so time to jump in with boots on.
Pre-install Configuration
So there’s some things to be done before installing this Plasma Mobile image to the machine. I’m not going to jump in and start the installation process here, because there’s another problem that will prevent installation unless the system is (re)configured before starting the installer.
On a mobile device, generally you want to quickly access any removable media added to the system: plug in a hard disk or a USB stick, and it should be used immediately. That makes sense on a mobile device, but the same settings are applied here in an installer ISO, and what happens when you partition a hard disk? Right, it gets “reattached” to the system, which may immediately start to use the new partitions.
This wouldn’t be an issue except that once a partition is in use (that is, mounted), many other actions like changing flags on the partition, tweaking the filesystem, etc. all fail. And Calamares does first one thing, then another, and what regularly happens is that the disk is “grabbed” for use before Calamares is done with it, and the installation fails entirely.
So let’s turn that agressive disk-grabbing off for now (remember to turn it back on once the device is installed).
Go to systemsettings: swipe up, and it’s there amongst the launcher icons.
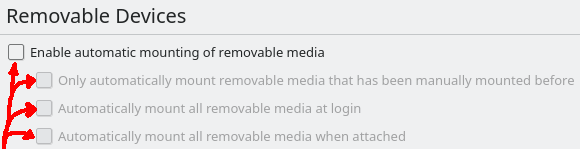
In systemsettings, find the Hardware page, and then the Removable Devices sub-page. This page has a bunch of checkboxes for what to do with those devices: in particular, there is automatic mounting which is enabled by default.

Turn it off. Turn it all off. I took the time to explicitly uncheck all four boxes, not just the top-level one.
Installation
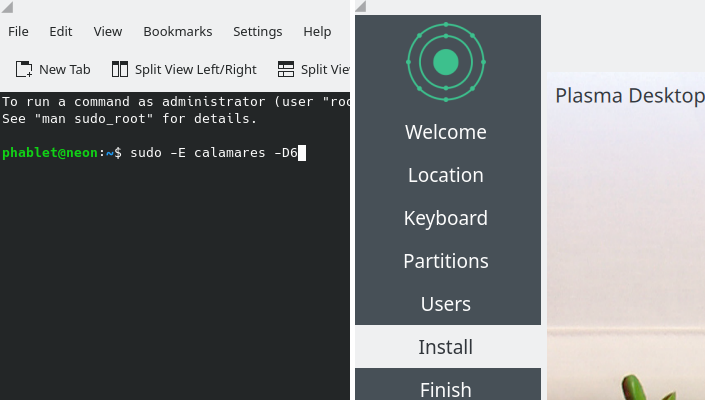
So, with these preliminaries out of the way, it’s time to start the
installation itself. Because the launcher icon doesn’t seem to work,
run Calamares by hand: it needs to run as root (hence sudo) and it’s
nice to have extensive logging in case something goes wrong (hence -D6).
sudo calamares -D6
Running Calamares from konsole like this is a little weird, since all the applications are fullscreen on Plasma Mobile, but it looks like and installer and acts like an installer and with the corrected configuration, works!
And there you have it: a Plasma Mobile installation on a desktop computer. I took these screenshots in a VM, but I’ve been told that it works on a Dell 2-in-1 as well.
Lessons
The workaround described here is for the Plasma Mobile desktop edition neon-mobile-20201213-1707.iso, and may not apply to later versions (if settings are tweaked or Calamares is updated).
Dealing with automount is annoying. I checked and there’s related issues filed against Calamares where agressive automount broke installations – so this isn’t a Plasma Mobile problem. Knowing that a regular user program can disable automount through systemsettings tells me that Calamares should be able to do so as well: that will solve the problem for everyone.
While installing over-and-over-again I noticed a bunch of annoying things in Calamares’s logging, so there will be some logging cleanup as well. That is mostly-invisible for end-users though.
Fixing the launcher icon is not something I can influence.
All in all it was fun to see Plasma Mobile running locally, and I think it is very much worthwhile to try on a 2-in-1 kind of device if you have one. Once some more of the installer kinks are worked out – there’s an issue tracker that welcomes issues from downstream, although end-users should probably be filing bugs against Plasma Mobile itself in KDE’s bugzilla.