bhyve for Calamares Development
bhyve (pronounced “bee hive”) is a hypervisor for BSD systems (and Illumos / openSolaris). It is geared towards server workloads, but does support desktop-oriented operation as well. I spent some time wayyyy back in November wrestling with it in order to replace VirtualBox for Calamares testing on FreeBSD. The “golden hint” as far as I’m concerned came from Karen Bruner and now I have a functioning Calamares test-ground that is more useful than before.
bhyve Intro
The bhyve manpage is quite extensive, and the FreeBSD handbook has another whole chapter on it, but none of them could answer my question:
How to boot a Linux live ISO to a KDE Plasma desktop in bhyve
I spent some time messing around with the configurations, and with chyves and vm-bhyve and looked at cbsd, but those are largely tools that hide what bhyve is doing, and do not advance my goal of (shouting again):
Desktop Linux computing in a virtual machine on FreeBSD
The most valuable hint came from Karen Bruner, on Twitter:
and a second-most-valuable piece of information, came from bhyve developers themselves, also on the Twits:

With a snippet in hand with “this works” I could confirm that at least it’s possible, and with the hint that VNC clients are annoying, I went and tried other VNC clients.
.. and the skies opened up, and a ray of light shone forth.
What I did wrong
As Rebecca Cran points out, boot is excruciatingly slow with UEFI. It really does take a minute or two to get through to the-Linux-kernel-is-starting, or Plymouth, or whatever. Once the Linux kernel starts, performance is fine. However, my impatience made me conclude that things were not working when they really were .. just .. glacially .. slow.
This was true in November. I think Rebecca has since updated the EFI firmware ports, because it now boots in seconds.
Karen Bruner hinted that not all VNC clients are equal. The one I was using has rendering issues, which didn’t improve my perception of bhyve’s usability for desktop VMs. See my VNC-client testing, below.
Dumb luck prompted me to try VNC from my Slimbook laptop (running openSUSE Tumbleweed)
to my FreeBSD server after a reboot of the server and that worked,
while running vncviewer locally on the FreeBSD machine
the night before
got me a garbled UEFI boot screen and no way
to provide keyboard input.
This taught me that bhyve reboots are not like VirtualBox reboots:
it’s essential to destroy the VM with bhyvectl --destroy
before, say, swapping out disks and CD images and other things.
Or, as in this lucky case, reboot the host.
Thanks to Karen, Rebecca and the bhyve developers, I know now what went wrong, so here’s some more notes on what goes right.
bhyve Installation
bhyve itself is part of the base system. Additional firmware for the VMs needs to be installed – in particular, UEFI firmware, possibly GRUB as well. I did the following:
# pkg install bhyve-firmware grub2-bhyve
# pkg install uefi-edk2-bhyve uefi-edk2-bhyve-csm
There is no UI to speak of in bhyve. Instead, the VM can have a serial console attached – which is lovely for a FreeBSD server VM, or for CentOS grinding through Java workloads but totally unsuitable for looking at recent Manjaro releases. The VM can also expose a UEFI framebuffer through VNC.
I’m going to recommend tigervnc-viewer, for the fairly-pedestrian reasons that it works well and I also happen to have it installed on my laptop. See the section on VNC-client testing, below.
# pkg install tigervnc-viewer
bhyve Host
It may be necessary to load the virtualization kernel module to get virtualization support at all.
# kldload vmm
Since bhyve is a virtualization system, it stands to reason that the host FreeBSD system needs some virtualized resources. The documentation is, again, extensive, but I’ve applied my amazing kolourpaint skills to the problem as well. First we need to virtualize some network bits.
To connect the VM to the outside world, it needs to have a virtual
network interface. These are tap devices, and they are created
via ifconfig create tapN where N is a number. The handbook
is inconsistent in numbering them, but it’s possible to
create a handful (say, tap0, tap1, tap2 and tap3)
so that there are enough interfaces for whatever networking is needed.
# ifconfig tap0 create
# ifconfig tap1 create
# ifconfig tap2 create
# ifconfig tap3 create
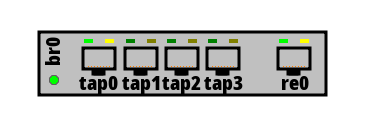
These interfaces are just dangling in the void, so we can wire them up to a network bridge – let’s pretend it’s a switch, so that my illustration matches (in any case the label br0 in the illustration is incorrect, bridges must be named bridge). All four virtualized network interfaces go on the bridge.
# ifconfig bridge0 create
# ifconfig bridge0 addm tap0 addm tap1 addm tap2 addm tap3
The bridge so far has no access to the outside world. Depending on intended use, that might be fine. For my Calamares testing, though, I’ll need a connection so the VMs can download packages. This bit is host specific, since it ties the bridge to a physical interface on the host machine – and then the bridged traffic goes out on that interface. I have a re0 interface that I’ll offer to the VM; this does not have to be exclusive to the VM bridge. Then I’ll bring the bridge up and configure the virtualized network interfaces to come up on demand.
# ifconfig bridge0 addm re0
# sysctl net.link.tap.up_on_open=1
# ifconfig bridge0 up
That’s all there is to it – keeping these settings beyond reboots is an exercise for another time.
bhyve Storage
This is where ZFS gets a chance to shine. You can carve out a block device from available storage and use that as a “dedicated disk”. I’ve written about it when it goes wrong and how to fix it, but not how to set things up normally.
ZFS has storage pools. Usually there’s one called zroot, but there
may be more. I bought a 4TB HDD at one point, and it is a storage pool
of its own, called zbigone (from ‘Allo ‘Allo). I can create a
16GB block device on that with zfs create. I don’t want it
to be examined by GEOM, so it gets some special settings.
# zfs create -o volmode=dev -V 16G zbigone/bhyve-scratch`
bhyve Command Line
The bhyve command-line is a bear. Basically you are configuring a virtual PC on the command-line, so there are tons of options. The documentation gives an example, but here’s what I use. My VM’s need to run X11, they boot from a Linux ISO, and they need enough memory to build Calamares as well.
Here is the command-line, split out into bullet points, first the general machine configuration:
/usr/sbin/bhyveThat’s the command.-HPThis machine will yield the virtual CPU on HALT and PAUSE instructions; that’s polite.-AThis machine gets ACPI tables.-c 4Four CPU cores.-m 4096MFour gibibyte of RAM.-l bootrom,/usr/local/share/uefi-firmware/BHYVE_UEFI.fdBoot UEFI.-l com1,stdioHook the serial console of the guest to stdio so you can watch it in konsole.
So far, so good. Next, we put together the PCI slot configuration of the virtual machine. It’s like soldering your own motherboard! We’ll need a bunch of parts, including a PCI-ISA bridge to hook that serial console to. I threw away the last motherboards I had with ISA slots this year, but virtually they live on. PCI slots are numbered. There are some some conventional assignments, but plenty of space for VMs with different device setups (e.g. removing the CD ROM drive after installation). I’ve left some gaps in the numbers here to allow extra devices.
-s 0:0,hostbridgeThe VM bridge to the host. Required.-s 1:0,lpcA PCI-ISA bridge. Required for that serial console.-s 2:0,virtio-net,tap0A virtual network adapter, connected to one of the virtual interfaces. That’s tap0 in this case, but the VM could be hooked up to a different one (for multiple VMs at once, a must) or multiple ones. Remember that you can’t jam two network cards into one PCI slot, so you’ll need a different number for other cards.-s 4:0,virtio-blk,/dev/zvol/zbigone/bhyve-scratchA virtual block device. This is the ZFS block device created earlier. It is possible to have more disks attached.-s 6:0,ahci-cd,/zbigone/vm/iso/Pep11-dba4-20210131.isoA virtual CD device. The ISO image is specified; here I’m using a Peppermint image. There is no “empty CD drive” device as far as I know. To boot the VM with no CD, unsolder the PCI slot with the drive in it.-s 29,fbuf,tcp=0.0.0.0:5900,w=800,h=600,waitA (EFI) framebuffer. This one will be accessible on localhost at port 5900 and is an 800x600 framebuffer. That’s fairly limited for modern desktop Linux. Bigger sizes are possible. The wait argument means the machine won’t boot until a VNC client connects, which may be useful for initial-boot debugging.-s 30,xhci,tabletThe mouse.
So my virtual machine has 7 PCI slots: slots 4 and 6 specify the HDD and CD. And after all that, I still need to give it a name, too!
The complete command-line is
# /usr/sbin/bhyve \
  -HP \
  -A \
  -c 4 \
  -m 4096M \
  -l bootrom,/usr/local/share/uefi-firmware/BHYVE_UEFI.fd \
  -l com1,stdio \
  -s 0:0,hostbridge \
  -s 1:0,lpc \
  -s 2:0,virtio-net,tap0 \
  -s 4:0,virtio-blk,/dev/zvol/zbigone/bhyve-scratch  \
  -s 6:0,ahci-cd,/zbigone/iso/Pep11-dba4-20210131.iso \
  -s 29,fbuf,tcp=0.0.0.0:5900,w=800,h=600,wait \
  -s 30,xhci,tablet \
  pep11
It’s no wonder there’s a half-dozen scripts and tools out there that wrap up bhyve command-lines into something slightly easier to manage.
bhyve VM Shutdown
Connecting via VNC generally works fine. After I’m done with the VM I can power it down via the desktop buttons (logout / poweroff or whatever in KDE Plasma or XFCE or the desktop environment of the day). That closes the VNC viewer, and the bhyve command returns.
But the VM is not really dead. It needs
an extra stroke, bhyvectl --vm pep11 --destroy
to get rid of it for real. Some of my
previous struggles came from not understanding
how to really switch off and reboot a VM.
VNC-Client Testing
I use tigervnc-viewer which, as I said, “works well” and
which is something I had installed on my laptop too.
But for completeness, here’s a list of what I found in ports with
port names *vnc*:
net/gtk-vnc– a library only, not a full clientnet/libvncserver– a library for writing VNC serversnet/neatvnc– a library for writing VNC serversnet/remmina-plugin-vnc– plugin for somethingnet/ssvnc– enhanced tightVNC client 👍net/tigervnc-server– a servernet/tigervnc-viewer– a VNC client 👍net/tightvnc– a VNC client 👍net/vncreflector– specialized servernet/wayvnc– VNC for Wayland, not what I need right nownet/wlvncc– VNC for Wayland, another implementationnet/x11vnc– VNC serversecurity/vnccrack– security is lousy anywayvietnamese/vnconvert– Vietnamese character set conversion, not what I needwww/novnc– VNC in the browser, count me in 👍www/novnc-websockify– support for the previous onex11-servers/x2vnc– conjoining X11 screens and VNC
It turns out remmina is a GNOME all-the-display-things tool, but it took
a bit of digging to find out from the FreeBSD ports metadata that
it was a thing. Good metadata is hard to find (please be gentle). Pot,
meet kettle, net/krdc is also an obscurely-named VNC client. So add to the list:
net/krdc– VNC client 👍net/remmina– VNC client 👍
So that’s six (6) VNC clients that I can apply to the VM. Let’s see how they do:
| Port | ISO? | Boot? | Running? | Notes |
|---|---|---|---|---|
| krdc | ✅ | ✅ | ✅ | Stutters |
| remmina | ☠ | ❌ | ☠ | Cores out on connect |
| ssvnc | ✅ | ✅ | ✅ | 👍 |
| tigervnc-viewer | ✅ | ✅ | ✅ | 👍 |
| tightvnc | ✅ | ❌ | ❌ | 🤷 |
| novnc | ☠ | ☠ | ☠ | What even.. |
For each client, I’ve noted three things:
- whether they start a live desktop when booting a KDE neon ISO image,
- (after installation) whether they get the machine from the boot-pause (right after bhyve starts the machine and waits for a connection) to the display-manager for login,
- (after installation and login) whether a once-started machine can be accessed.
Turns out novnc is a non-starter: it’s a bash script that checks for
/dev/tcp entries (wut? neither KDE neon nor FreeBSD have those) so it won’t even start.
remmina does OK when connecting on post-installation boot, but cores out after a while;
reconnecting exits immediately with a bus error. tightvnc suffers from
drawing artifacts; mostly that it paints tiles rather than
continuously, so I need to swab the screen with the mouse pointer
to get updates. How bad this seems varies a bit; it’s also possible to
connect and get a decent desktop experience.
krdc seems slower and more jittery than the others that work.
So, after a ton of boots and re-boots, I’ve settled on using tigervnc-viewer.
bhyve in Practice
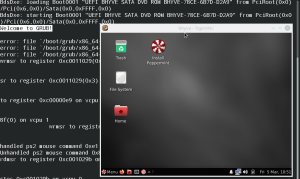
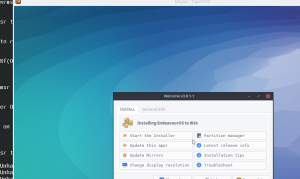
Here are two screenshots: different Linux ISO’s booted with a 1200x900 framebuffer (that’s slightly different from the command-line given earlier). The screenshots show a bit of the konsole from which I started the VM and part of the tigervnc-viewer window, for a sense of size and proportion.
This is Peppermint, which boots but doesn’t like the UEFI framebuffer size; X11 picks 640x480 VGA which is a little cramped for modern usage. I suppose I could use i3 and then tile 12 VNC windows / VMs on my one monitor, for nuclear-powerplant-operator-in-movies vibes.
This one is EndeavousOS, which boots and does pick the UEFI framebuffer size of 1200x900 for X11 as well.
When I tried KDE neon, KaOS, or Manjaro, they would boot but X11 (or possibly “the graphical environment” since perhaps one defaults to Wayland) doesn’t come up. The VM isn’t wedged, it’s just very-stuck on X11. I’ve tried enabling the serial console on boot, and that lets me log in.
Given that I want to be testing the KDE neon and KaOS and Manjaro ISO’s, I think the conclusion right now is: bhyve is not for me. There’s PCI passthrough and video card futzing that can be done, and I suppose I could use a running (serial-console) Linux VM for compile-testing Calamares, or even remote-X11, but for now: VirtualBox is still the right tool for what I need to do.
As I was finishing writing this, I finally stumbled across this Win10-in-bhyve article which describes almost exactly the same steps I went through and the same collection of frustrations: it seems that the-documentation-could-be-better is a long-standing issue. The talk by Yan Ka Chiu at EuroBSDCon 2019 describes GPU passthrough.